In an age where school safety is more critical than ever, one of the most effective ways to protect students, staff and visitors is by monitoring who comes and goes from the building. Visitor management is no longer simply signing in on a notebook or clipboard – it’s a vital component of a school’s overall safety protocol. Whether your school is a small private institution or a large public district, implementing a reliable visitor management system (VMS) should be a top priority.
In this blog, we explore visitor management system for schools – why schools need it, the features to look for, how to select and implement the right solution, and who should be involved in making these decisions. We’ll also include a sample visitor management policy to help schools get started and provide a comparison between manual and software-based systems.
Why Visitor Management Matters in Schools
1. Student and Staff Safety
Schools are responsible for protecting one of society’s most vulnerable populations – children. A VMS acts as the first line of defense, deterring unauthorized individuals from entering and providing schools with a detailed record of every visitor.
2. Regulatory Compliance and Liability Protection
Many states and school districts have adopted safety mandates that require visitor tracking or even background checks for visitors and volunteers. A robust system helps schools comply with these regulations and can protect them legally if an incident occurs.
3. Transparency and Accountability
Parents, staff, and students feel safer knowing that the school is taking proactive steps to control access. A digital visitor log ensures that administrators can quickly access records in case of emergencies, audits, or investigations.
4. Efficiency and Professionalism
Gone are the days of illegible handwriting or missing sign-in sheets. A modern VMS improves front desk efficiency and reflects a school’s commitment to professional, streamlined operations.
Here is a side-by-side comparison of Manual Sign-In vs Electronic Sign-In:
While manual systems may suffice for low-traffic environments or tight budgets, they don’t offer the security advantages and features that schools need to respond to today’s security challenges.
Essential Features in Visitor Management System for Schools
When evaluating visitor management solutions, schools should look for features that balance ease of use, security, and scalability. Here are some key features to prioritize:
1. ID Scanning and Verification
Ability to scan driver’s licenses or government-issued IDs.
Verify against national sex offender registries or local watchlists.
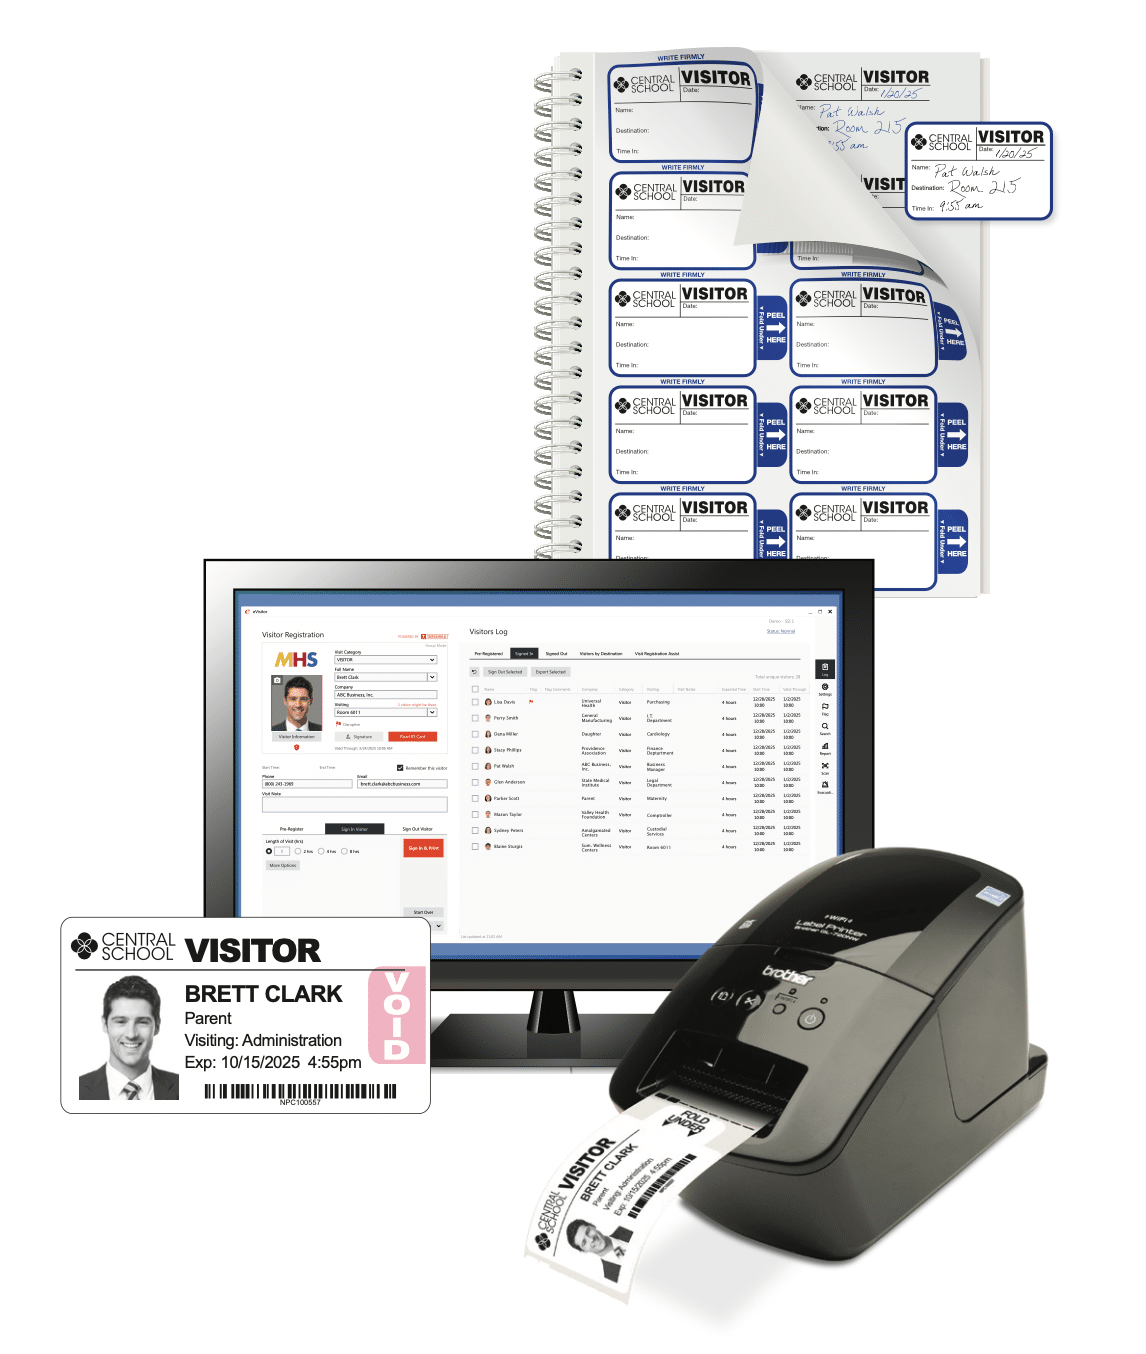
2. Badge Printing
Print temporary visitor ID badges with the visitor’s name; a clear current photo; their destination or purpose of visit; and the date/time.
3. Customizable Sign-In Workflows
Options to include health screening questions, emergency contact info, or acknowledgment of school policies.
4. Pre-Registration Capabilities
Allow parents, contractors, or volunteers to pre-register for smoother, quicker entry.
5. Instant Host Notifications
Notify teachers or staff when a visitor arrives to meet them.
6. Integration with Student Information Systems or Emergency Platforms
Helps coordinate lockdowns, evacuations, or parent pick-up processes more effectively.
7. Cloud-Based Storage and Reporting
Access data from anywhere; generate historical logs, visitor trends, and compliance reports.
8. Data Privacy and Security Compliance
Ensure systems meet FERPA and local data protection standards.
How to Choose the Right System
Step 1: Conduct a Needs Assessment
Start by evaluating current visitor flows, security concerns, and any compliance mandates your school or district must meet. Gather input from front office staff, security teams, and administrators.
Step 2: Form a Selection Committee
Decision-making should involve:
School administrators (principal, assistant principal)
District safety officers
IT staff (to evaluate tech requirements)
Facilities/security managers
Front desk personnel (to assess usability)
Parent representatives – optional, but valuable for buy-in
Step 3: Research and Demo Solutions
Request demos from leading vendors. Look for ease of use, customization, pricing transparency, and customer support. Ask for school-specific case studies or references.
Step 4: Pilot the System
Run a pilot in one or two buildings to identify issues before district-wide rollout. Gather feedback from staff and visitors.
Step 5: Plan the Rollout
Schedule training sessions, develop a communication plan for parents and staff, and update any related policies.
Sample Visitor Management Policy for Schools
Here is a sample visitor policy that you can edit to your specific school situation and then share with parents and staff and post on your website. Check with your district for specific policy details.
Visitor Management Policy Template
To ensure the safety of all students and staff, SCHOOL NAME HERE uses a visitor management system to monitor all guests who enter the building. All visitors, including Parents, Contractors, Vendors, and Volunteers, must:
Stop in the main office and present a valid government-issued ID upon arrival.
Be screened through the visitor management system, which may include a background check against national registries. (if applicable to your system)
Wear a visitor badge that is clearly visible at all times while on school property.
Sign out at the main office before leaving the premises.
Visitors who do not comply with these procedures may be denied entry.
The system stores visitor data securely and is only accessible by authorized personnel in accordance with privacy regulations.
We appreciate your cooperation in keeping our students and school safe.
Implementation Best Practices
1. Communicate Early and Often
Inform parents, staff, and the school community in advance. Provide FAQs if possible.
2. Train Office Staff Thoroughly
Ensure all front desk employees are confident using the new system. Their interaction helps set the tone for visitors.
3. Prepare for Exceptions
Have procedures in place for visitors without IDs, emergency responders, or group check-ins. If your system connects with a national registry or watchlist, you will also need a clear policy and procedure for handling matches to the registry.
4. Review and Update Regularly
Evaluate the system annually to ensure it meets current security and safety needs and incorporates any new features or protocols.
Summary
Visitor management is no longer optional – it’s an essential part of a comprehensive school safety plan. Whether you’re transitioning from a paper logbook or upgrading an older digital system, the right VMS can help schools better protect their students, streamline operations, and meet compliance requirements.
By investing the time to choose a complete solution and implementing it with care, schools send a clear message: safety comes first. A well-executed visitor management system not only secures the school environment but also builds trust with the community.
Contact Threshold to learn more about our easy-to-use eVisitor Software for schools and our unique expiring visitor badges that are compatible with many school visitor management systems, including Raptor. These badges add an extra level of security by changing color overnight, providing a quick visual alert to school staff. Our software and badges are used in schools nationwide.
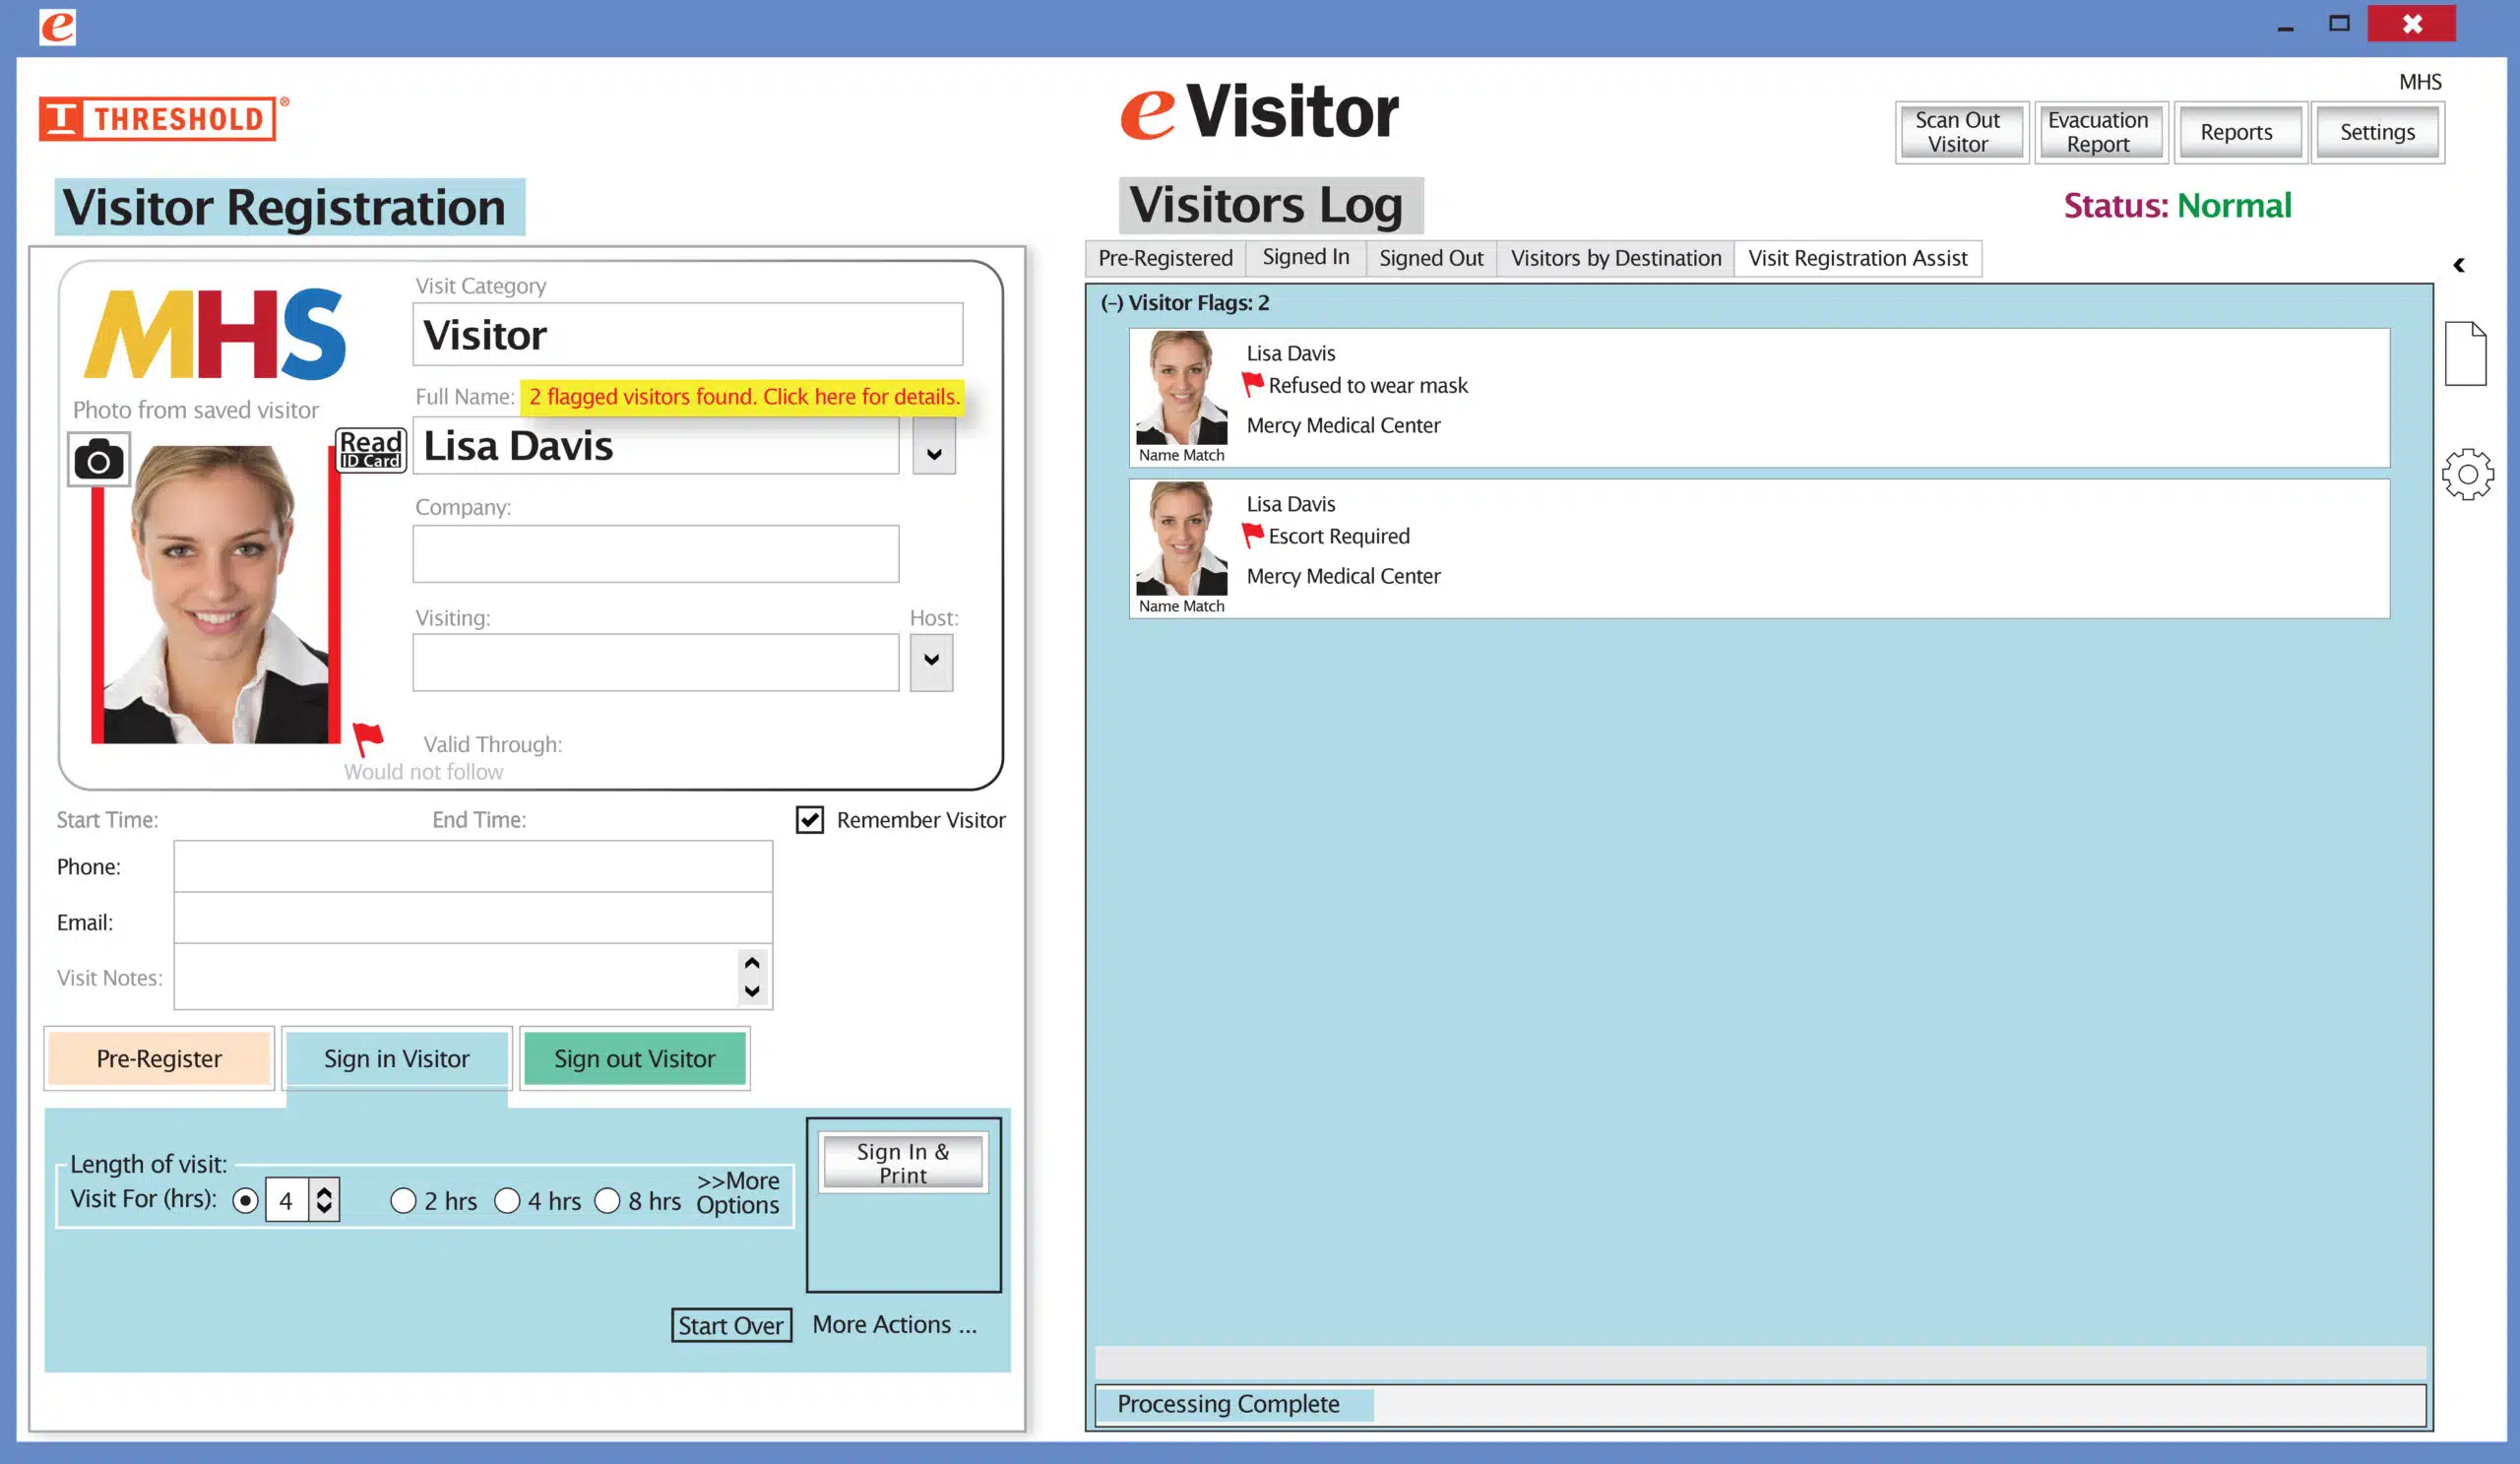
The Red Flag feature has been improved! Now you can set your system to not print a badge for any visitor record that has been previously marked with a Red Flag. The attendant will be prompted to redirect the visitor according to your security protocol.
Special New Feature: Red Flag, No Badge
It’s easy and free to activate this feature. Simply call us and ask for “Red Flag, No Badge” to be turned on. Once it’s on, the above pop-up will come up when a red flagged visitor comes back. No badge will print and the attendant will need to follow the facility’s policy for handling red flagged visitors.
The flags and notes only show to the desk attendant, not the visitor.
Please contact eVisitor Support with any questions on how to use Flags in your system.
If you have seen a special offer in our advertising, mailings, or emails, this is the area to enter the Promo Code to receive that offer. After you’ve entered the Promo Code, click “Update cart” for the code to take effect. If you have any questions, please call 1-800-243-1969.